
Sticky Keys - classic EUD device privilege escalation
Background
Sticky Keys is an accessibility feature within Windows that assists users who have physical disabilities. Instead of having to press multiple keys at once, you can use one key by turning on Sticky Keys and adjusting the settings. However, the feature can be manipulated to elevate your local privileges. Now this technique is not new and has been around since the days of Windows XP but is still relevant if you have physical access to a device.
Sticky Keys (AKA sethc.exe) is invoked when shift is pressed 5 times and if this happens pre-login, it runs as system. If sethc.exe is replaced with a custom binary of the same name, in theory when Sticky Keys is invoked your binary will run as system. In a default state, Windows protects sethc.exe via standard file permissions and simply replacing sethc.exe with a custom binary as a standard user would be too easy!
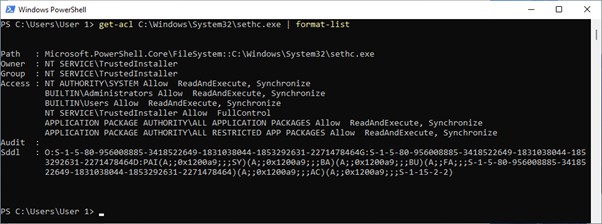
Figure 1: Default permissions for sethc.exe
The good news for an attacker is, if you have physical access to a device with limited configuration hardening and can boot it into either Windows Recovery Environment (WinRE), another operating system or access the operating system disk in an unencrypted format sethc.exe can be replaced.
How to execute the attack
For this demonstration, sethc.exe will be replaced with cmd.exe (Command Prompt) within WinRE against a standard Windows 11 build. The steps covered would be extremely similar for Windows 10 and older versions of Windows. The steps involved are:
- Accessing the operating system disk with WinRE
- Backing up the original sethc.exe
- Replacing sethc.exe with cmd.exe
- Restarting the device back into Windows 11
- Press shift 5 times to invoke the new sethc.exe binary
- Create a persistent local administrator
Accessing WinRE
The first step is to access the operating system’s disk without the operating system running. To launch WinRE restart Windows with the shift key held down and then choose the following options: Troubleshoot > Advanced options > Command Prompt. If the device is protected by BitLocker, you will need to obtain the recovery key.
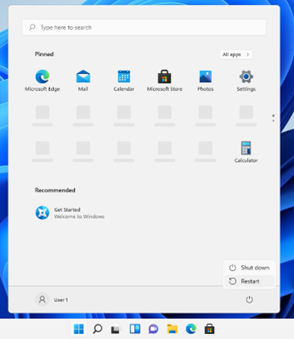
Figure 2: Click 'Restart' with the shift key held down to access WinRE
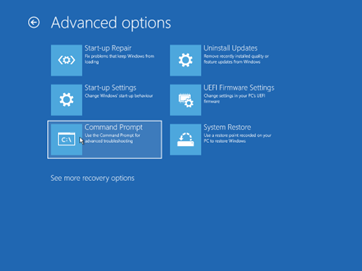
Figure 3: Launch 'Command Prompt' from Advanced options
Backing up sethc.exe
The original sethc.exe binary should be backed up for restoration after the attack. Run the following to copy it to the root of C:\:
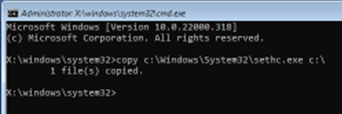
Figure 4: Backing up sethc.exe
Replacing sethc.exe
With a copy of sethc.exe made, the original can be replaced with cmd.exe or any other binary of your choosing. Run the following to achieve this:

Figure 5: Replace sethc.exe with cmd.exe
When completed, close WinRE and restart the back into Windows 11. Of course, whilst you have the disk in this state you could consider taking a copy of the SAM and SYSTEM files to obtain the credentials for any existing local administrator accounts.
Using the replaced sethc.exe
When Windows has started and you have reached the login screen, press the shift key 5 times. If everything has been copied correctly, sethc.exe will invoke and you will be presented with a Command Prompt which is running as system.
Figure 6: SYSTEM-level command prompt
Now at this stage, you have a system level Command Prompt however if you login this will change to the privileges of the user you are authenticated as.
Creating a persistent local administrator account
With the Command Prompt, run the following commands to create yourself a dedicated user that has local administrator rights:
![Pre-login Windows 11 desktop screen with a SYSTEM-level command prompt. Commands run are: net user newadmin [password] /add, followed by, net localgroup administrators newadmin /add](/files/inline-images/Sticky%20Keys%20Figure%207.png)
Figure 7: Creating a new local administrator account
Close command prompt and log in using the new account. At this point, you will have full local administrator access to the device. Don’t forget to move the original sethc.exe in C:\ back to C:\Windows\System32!
Mitigations
This attack has been around for a long time and as demonstrated is still valid on the latest version of Windows 11. It can also be used as a valid route to gain administrator access to a system when locked out. However, there are some controls which can be put in place to mitigate malicious activity and include disk encryption and EDR tooling.
BitLocker's full operating system disk encryption with recovery keys that are only accessible to key personnel or administrators provides the most comprehensive solution. An attacker could have physical access the disk from WinRE or another operating system but they would require the BitLocker recovery key to gain data access. This solution does not require additional software to be installed but does require planning. NCSC’s Device Security Guidance provides details of a recommended BitLocker configuration.
If you have access to EDR tooling such as Microsoft Defender for Endpoint, it is likely to detect Sticky Keys attacks and stop such malicious activity. However, if an attacker has got to the point of replacing sethc.exe it is likely they have modified the disk, potentially disabled other controls, and removed key data assets greatly impacting the integrity of the device.
Improve your security
Our experienced team will identify and address your most critical information security concerns.